Sunday, February 28, 2010

Fireplace Face Lift

So our fireplace is original to the house, which means it was built in the 1930's. The previous owners did a nice job of adding a molded mantle and painting the old brick a solid, neutral white to match the trim throughout the rest of the living room and the house.


However, we could definitely do without the "lovely" brass accents on the fireplace insert. It makes the fireplace look old and outdated, even despite the other efforts (white painted brick and molded mantel) to bring this piece up-to-date.

Our solution: give the metal fireplace insert a $5 face lift by spray painting the entire piece a solid black with Rust-Oleum High-Heat from the local hardware store.

Step 1: dust and clean the insert


Step 2: tape off the glass window panels with easy to remove tape


Step 3: spray on the first coat of paint and let dry for a few minutes


Step 4: spray on a couple more coats of paint and then let dry completely for a couple hours before handling

 voila!

5th & final step: re-install insert in fireplace and enjoy!


A HUGE upgrade from what it looked like before


Friday, February 26, 2010

Snow Day

There have been rumors of a winter storm approaching our area for the last week now - first it was supposed to hit Thursday morning, then that got pushed back to late Thursday afternoon, and that got pushed back to Thursday night, and of course that got pushed back to Friday morning... you get the point - honestly, the should have just said it will get here when it gets here.

When you work in a school, this kind of winter weather rumor leads to hopes of a surprise day off. But every time they pushed the arrival time of the storm back, this lessened our chances for a snow day as it began to look like the storm wouldn't arrive until the weekend :o(

But fear not, we woke up this morning to a BIG white surprise

 (icicles hangin from our back porch - lookin into our backyard)


(Bryan attempting to keep up with the snow & shovel us out)


(notice the almost completely buried fence on the right)

And I woke up to a lovely alert text message from our local news station, informing me that my school had been closed!!! Now don't get me wrong, you could get around town if you needed to - but there is enough snow out there (and it's still coming down), and the roads are bad enough that we really should stay inside today. This is our first snow day of the year (highly unusual for this area) and much needed - there's something great about a "surprise" workday off, that you just gotta love, sit back, relax and enjoy!

But of course, when I am stuck in the house all day I tend to get a lil stir crazy. I just need something to do, particularly a creative outlet - I am literally forced to do nothing but look around our house and notice all of these things that I want to do.

So in honor of my wonderful snow day and resulting cabin fever, today's project was one that has been nearly 2 years in the making


I give you our wedding invitation, finally framed and hung up in our living room!!! I have been meaning to tackle this project ever since I designed these invites back before our wedding in 2008 - and now I can finally cross it off of my to-do list!!! Unfortunately, this little arts 'n crafts project only took me all of half an hour to complete. And so now I must find something else to do...

Lookin Up

to the second floor of our home... our house is a cape cod, but the one thing that the previous owners didn't do was finish and utilize the second floor. It's a beautiful space that spans the entire length of the house, and we are currently working to finish it so that we can use it as our master bedroom. In order to do this we need to rip down the years of mixed wall materials and replace them with some up-to-date drywall, then install some carpeting to match the rest of the house.

It's a long and ongoing process - here's what we have so far


and here's what we're working towards
 much more tastefully decorated of course, but you get the idea.

Our next step is to call the town and find out about zoning and permit laws regarding drywall relacement - we wont be touching the physical structure of the house, but we will need a dumpster to dispose of the old wall materials and so we want to be straight with all of our paper work (if any is needed) since a construction sized dumpster will need to be parked in our driveway for a good amount of time. 

After that we can start tearing down the old walls!

Tuesday, February 23, 2010

Bathroom Overhaul

The one bathroom in our house was fairly updated by the previous owners. They had tiled the floor and lower portion of the wall, replaced the tub and shower, and put in a new vanity set. So it def had that standard, contractor look to it - complete with oak laminate cabinetry, and bare-bulb lighting.

the bathroom BEFORE

the bathroom AFTER
We painted the cabinetry black, removed the old magnetic mirror/bare-bulb lighting combo and replaced them with a black framed mirror and new light fixture, purchased a new shower curtain set, added some matching window treatments, and wall art! Voila!

The black framed mirror and new light fixture were both purchased from Lowes. While the shower curtain, bath mat and hand towel were all purchased from Bed Bath & Beyond.

My DIY $10 wall art -
$3 ea. 4x4 black picture frames, filled with 50¢ scrapbooking paper.

First On The List

When the offer was accepted on our house, we knew that the first thing we needed to do was to buy some new living room and dining room furniture. Our old stuff was from early in our relationship, and really selected with our apartment in mind.

Since our house is on the smaller side, we knew that we wanted a light and airy look throughout. And so for our new furniture, we were looking for (1) smaller, streamline motion furniture, (2) furniture that would hold up to wear-and-tear and to our 2 cats, (3) a table made for entertaining, and (4) that could seat more than 4 people. What all that in mind, this is what we ended up with...

the dining room BEFORE


the dining room AFTER
It's amazing what a nice coat of beige paint, new light fixture, table and chairs, artwork, and window treatments can do for a space.


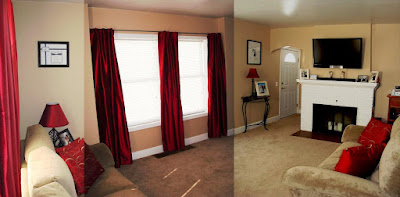
the living room BEFORE

the living room AFTER

We kept the same paint color and accents from the dining room

Overall we are very happy with the way that these two rooms came out, they def feel more like home now. We still have a list of things we would like to do, in the living room at least:
  • replace/refinish the fireplace insert (completed 2/28)
  • re-tile the fireplace floor
  • tile the entry way
  • purchase some entertainment shelves
  • purchase some more wall art (completed 3/5)

    The Grand Tour

    Here are the market pics of our house...

    the kitchen


    the dining room


    the living room


    the bathroom

    Welcome

    To our humble abode :o)
    We were married on July 5th, 2008 and we just recently purchased our first house on November 18th, 2009!!! A 2 bedroom, 1 bath cape cod in our hometown so that we could be close to family and friends.

    Our new house was completely move-in ready with many updates - new vinyl siding, tear-off roof, vinyl replacement windows, water heater, furnace, carpeting throughout, kitchen cabinetry, bathroom tile and vanity set, etc. Plus the previous owners were selling so that they could move out of state, and so they were also leaving us all of their newer appliances!!!! Bottom line - it was an amazing deal.

    No less, as a new homeowner you always want to get in there and make it your own. It is my hope that this blog will chronicle our adventures in home renovation and decoration.

    Having planned our wedding, and considering myself a very DIY bride, I hope to bring that same passion for creativity into our home.